

Kitchen SetUp:
- I put kitchen towels down on both side of the counter for several reasons. Lemon curd is sticky and hard to get off the counters. Also the jars are wet when they come out of the canning bath and can slip around. Also you can use the towel to protect your hands from heat.
- Spoon holders are a must. Lemon curd is sticky, I cant emphasize that enough.
- I keep the tongs and canning tools as close to the canning bath as possible, and put the jars and rings and vinegar for wiping on the other side where I'll be ladling into jars.
- I usually make two triple batches of curd at once (about 8 or 9 8 oz jars). I have tried 3 simultaneous batches and it is just too much multitasking. I have also tried quadrupling the recipe but I have found that if you try to make more than a triple batch in one pot it just doesn't set up right.

Stove SetUp:
- Here is a close up view of the stove set up. My two batches are going merrily on the left, while my canning bath with jars is boiling away on the right and my sauce pot with lids is on low heat. I am actually right about to start ladling into jars which is why the lids are heating. I typically don't put them on the stove till the curd starts to thicken.

Consistency of Curd when ready:
- This was the hardest thing for me to learn, when the curd is ready to put into jars. It should be a thick custard-like consistency. When you stir it it will leave traces which will take a while to incorporate. Also if you dribble it back into the pot you will see traces like the picture above which will take time to reincorporate.
- It will also coat the back of the spoon in a thick coating as in the picture below. One sure sign that you are close to ready is if you spoon begins to stick to your spoon rest when you put it down.

Filling the Jars:
- I have a couple ways that I have done this. Here you see me using a ladle to fill the jars. It works but has a tendency to dribble so be sure to wipe your rims before putting on the lids.
- I have also poured the whole pot of lemon curd into a large pyrex measuring cup and then used it to pour into the jars, or just poured from the pot itself on small enough batches. The pyrex measuring cup with spout was the least messy. I am looking forward to getting my canning set which includes a funnel.

Burping the Jars:
- Take a butter knife and stick it down to the bottom of the jar in a couple of places to release any trapped air bubbles.
- This is not as obligatory with Lemon Curd as it is with Jam and Jellies because Lemon Curd tends to be thinner and not trap air bubbles. However best to do it, just to be safe.

Wiping the Rims:
- Using plain white vinegar on a clean cloth wipe the rims to make sure no residue or grease is on them.

Placing the Lids:
- Using tongs or a magnet stick pull the lids out of the hot water and gently shake off extra drops.
- Handle the lids by the extreme edges and try not to touch the plastic seal as you place them on the jars.

Placing the Rims:
- Gently screw on the rims, and take care because the jar will be almost too hot to touch. Screw the rims on until tight.
- Don't force the rims or over tighten them because this will prevent the seal from forming.
Processing the Jars:
- Place the jars in the canning bath on the rack amid try to make them not touch each other.
- Bring the water to a boil and boil 1o minutes.
- Remove the Jars and place on towers to dry.
- You should head each lid pop as the vacuum begins to form. This will take several minutes. Do not touch the lids or jars or play with them in any way during this time
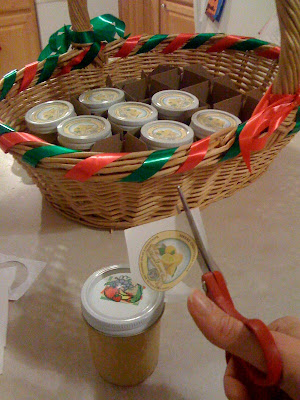
Labeling the Jars:
- After the jars have formed a vacuum, you can dry them off and label them.
- I use a full sheet label though my printer with a 12 to a page template that I have created and then cut the individual labels out with scissors and stick them on. I will put the template up soon as a .pdf file and have a link to it here.
- You can also tie a small ribbon around each jar for a beautiful presentation.
- The foldable divider that comes in the package when you buy the jars can be placed inside a decorated basket to provide a great way to protect the jars in transit.

No comments:
Post a Comment